Getting Started with Case Studies in Massage Classrooms
Introduction
If you’ve ever watched a student freeze when asked how they’d approach a client with a specific condition, you’ve witnessed the gap between knowing information and applying it. Students can memorize contraindications, recite muscle origins and insertions, and list pathology characteristics, yet struggle when faced with the complexity of a real client situation. This is where case studies become invaluable. By bridging the gap between theoretical knowledge and clinical reasoning, case studies transform passive learners into confident practitioners who can think critically, make informed decisions, and adapt their treatments to individual client needs.
What Are Case Studies?
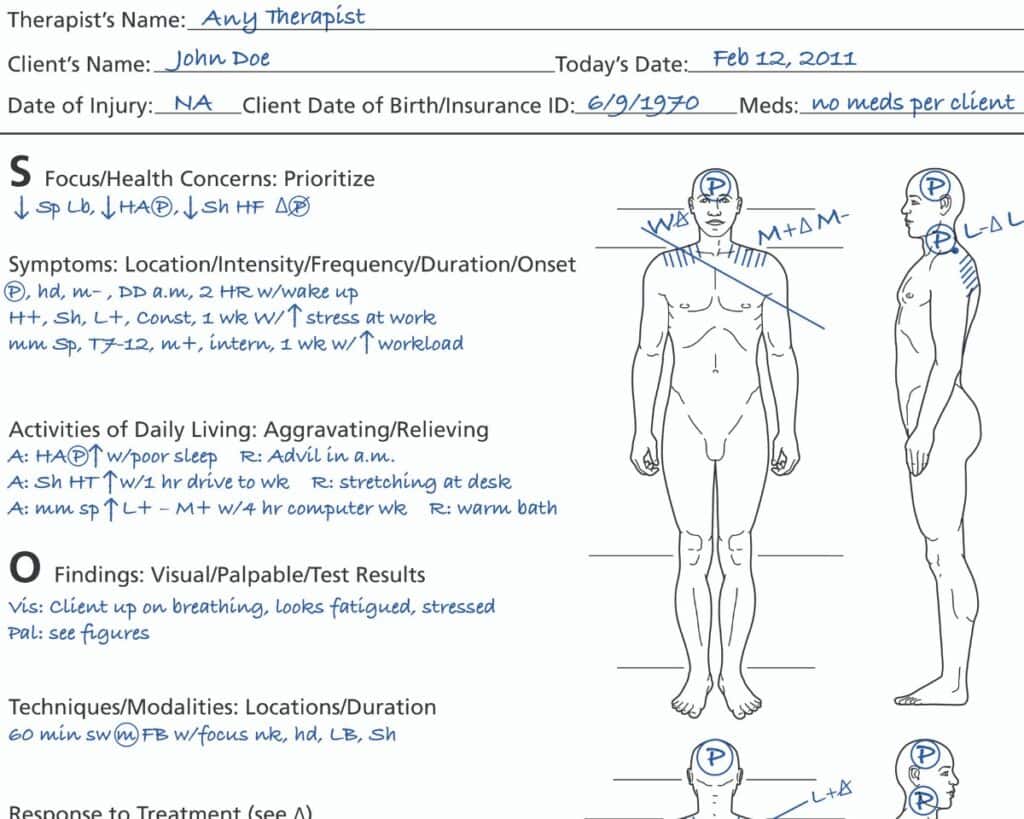
In massage therapy education, a case study might be as simple as a written client profile describing symptoms and health history, or as complex as a role-playing scenario where students conduct intake interviews and perform assessments. The essential element is that students must actively engage with realistic clinical information and make reasoned decisions about how to proceed. Case studies can take many forms:
- Written scenarios where students read client information and develop treatment plans
- Role-playing exercises where students practice intake interviews and clinical reasoning
- Video presentations showing client interviews or symptoms that students must analyze
- Progressive cases that unfold over time, mimicking how real client relationships develop
- Problem-based learning where students research unfamiliar conditions encountered in case scenarios
What distinguishes case studies from simple review questions is their complexity and authenticity. Rather than asking “What are the contraindications for massage with hypertension?” a case study presents a client with hypertension alongside other health factors, medications, and treatment goals, requiring students to weigh multiple considerations and make nuanced decisions.
Case studies also create memorable, context-rich learning. Educational research consistently shows that information learned in context is better retained and more readily applied than information learned in isolation. When students learn about rotator cuff injuries through a case study of “Maria, a 52-year-old administrative assistant with shoulder pain that worsens when reaching overhead,” they’re more likely to remember and apply that information than if they simply read about rotator cuff pathology in a textbook. The narrative context creates mental hooks that make the information stick.
Three Practical Approaches to Using Case Studies
Ready to incorporate case studies into your teaching but not sure where to start? Here are three accessible approaches that work well in massage therapy education:
Weekly Mini-Cases for Immediate Application
Integrate brief case scenarios into your regular teaching rhythm by presenting a short case study at the end of each class. After teaching about a particular body system, pathology category, or treatment technique, present students with a simple scenario that requires them to apply what they’ve just learned.
For example, after covering the cardiovascular system, you might present: “Your new client mentions he takes medication for high blood pressure and has some swelling in his ankles. What questions would you ask during intake? What session adaptations might you consider?” These mini-cases take just 10-15 minutes but reinforce learning immediately while it’s fresh.
Progressive Case Studies That Build Complexity
Create a single client case that evolves throughout a course, with students returning to the same “client” multiple times as they gain new knowledge. Start with basic intake information early in the term, then add complexity as students learn new concepts.
For instance, you might introduce “James, a 35-year-old software developer with neck and shoulder tension” in week one. Students conduct a basic health history. In week four, after learning assessment techniques, students identify postural patterns and muscle tension. By week eight, after covering treatment planning, students develop a comprehensive approach. In week twelve, the case evolves when James reports improvement but now mentions a new symptom, requiring students to reassess and adapt.
This approach mirrors how real client relationships develop and helps students understand that treatment planning is an ongoing process, not a one-time decision. It also allows you to layer complexity gradually rather than overwhelming students with too much information at once.
Students Create Case Studies
One of the challenges with case studies is they take a lot of effort to create. However, students can learn as much from creating cases as they can for unraveling them. Try this activity where students use pathology materials to create authentic client health forms and interview experiences.
The Setup
Begin by explaining to students that they’ll be creating fictional client profiles based on their pathology coursework, then using these profiles for partner interviews and treatment planning. The activity typically spans two class sessions. In one session students research and prepare their health forms and interviews. In the second they present session plans and discuss what they learned.
Phase One: Creating the Mock Health Forms
Students work individually to create a detailed mock health intake form for an imaginary client using their pathology textbooks, class notes, and other course materials to develop a realistic, coherent client profile that includes:
- A specific pathology or soft-tissue injury (assign pathologies so you get variety)
- Relevant health history that might relate to or complicate the primary condition
- Current medications, if applicable
- Lifestyle factors that influence the condition
- Client goals for massage therapy
- Any other pertinent intake information
The key instruction here is authenticity. Students should research their chosen condition thoroughly enough to create a believable client. If they choose rheumatoid arthritis, they should understand typical symptom patterns, which joints are commonly affected, how the condition might progress, and what medications are standard. If they select a rotator cuff tear, they need to know mechanism of injury, typical pain patterns, what aggravates symptoms, and what the recovery timeline might look like.
This research phase is valuable learning in itself. Students engage with pathology materials with purpose and context, rather than simply reading to memorize. They’re thinking like practitioners: “What would a real client with this condition tell me during intake?”
Phase Two: Preparing for the Client Role
Once students complete their mock health forms, they prepare to roleplay as that client. This means getting into character by understanding both the clinical facts and the client’s perspective. What does the pain feel like? How does it affect daily activities? What has the client already tried? What are they hoping massage will do?
Students should note specific details they’ll mention during the interview: “When I reach overhead to get dishes from the cupboard, I get sharp pain in my right shoulder” or “The stiffness is worst in the morning and it takes about an hour before I feel like I can move normally.”
This perspective-taking is developmentally important. It helps students understand the client experience and builds empathy alongside clinical knowledge. When students later work with real clients, they’ll remember what it felt like to be the person in pain seeking help.
Phase Three: Partner Interviews
Students pair up, and here’s where the magic happens. Each partnership involves two complete cycles:
First cycle: Student A plays the client (using their prepared mock health form) while Student B conducts the intake interview as the therapist. Student B asks questions, listens to responses, takes notes, and gathers all relevant information just as they would with a real client.
Second cycle: They switch roles completely. Student B becomes the client (using their own mock health form) while Student A conducts the intake interview.
During the interviews, encourage students to make it realistic. If the “therapist” asks good questions, the “client” should provide detailed, helpful answers. If the therapist misses important questions, the client shouldn’t volunteer information creating natural consequences and learning opportunities.
After both interviews are complete, students stay with their partners for treatment planning. Now they step out of role and work collaboratively to develop comprehensive session plans for both clients.

Phase Four: Treatment Planning
For each of their two clients, student pairs must document:
Cautions and contraindications identified: What did they learn in the health history that affects how they’ll approach the session? This might include absolute contraindications that prevent massage entirely, local contraindications requiring area avoidance, or cautions that suggest modifications like reduced pressure, shorter session length, or specific positioning needs.
Session adaptations: How will they modify the typical session to accommodate the client’s condition? This might involve bolstering choices for comfort, table height adjustments, position changes during the session, or communication strategies for checking in about pressure and pain levels.
Body areas to be treated: Which areas will they address and why? Students should justify their choices based on the client’s primary complaint, related muscular patterns, and overall treatment goals. If a client presents with plantar fasciitis, will they only work the feet, or will they address the entire posterior chain? Why or why not?
Techniques to be employed: What specific techniques will they use and why are these appropriate for this client’s condition? Students should connect technique choices to their goals. For example, if they’re choosing gentle range of motion, they should articulate why that serves the client better than deep tissue work for this particular situation.
Time allocation: How much time will they spend on each area? This often reveals whether students understand treatment prioritization. A 60-minute session must be strategically planned and students can’t spend 20 minutes each on six different areas. They must make choices and justify them.
This planning phase requires students to synthesize everything they’ve learned: anatomy, pathology, contraindications, assessment, techniques, and clinical reasoning. They’re not just recalling facts but applying them in integrated, meaningful ways.
Phase Five: Class Presentations and Discussion
In your next class session, bring everyone together for presentations. Select three to six student pairs (depending on class size and time available) to present their cases and treatment plans.
Each presenting pair should:
- Introduce their client, including the primary pathology or injury and relevant health history
- Explain the clinical reasoning behind their treatment plan
- Describe specific cautions, contraindications, or adaptations they identified
- Detail which body areas they’ll treat, which techniques they’ll use, and how they’ll allocate session time
- Share anything challenging or interesting they discovered while working through the case
Here’s where peer learning becomes powerful. As each pair presents, students who aren’t presenting should actively listen and ask questions. Encourage questions like:
- “Did you consider working with [related muscle group or body area]? Why or why not?”
- “What would you do if the client reported increased pain after the first session?”
- “How would your plan change if the client also mentioned [additional complication]?”
- “What would you tell this client about home care or session frequency?”
These questions push presenting students to think on their feet and consider angles they might have missed. For students asking questions, it’s an opportunity to engage with pathologies they didn’t research themselves and see how different practitioners might approach the same condition differently.
As the instructor, your role during presentations is to facilitate discussion, highlight excellent clinical reasoning, and gently correct misconceptions. When you hear faulty logic, you can ask guiding questions that help students recognize the problem: “Tell me more about your pressure choice. What’s happening in the tissue when you have acute inflammation? How might deep pressure affect that process?”
This public problem-solving, done supportively, benefits everyone. The presenting students refine their thinking, and observing students learn from both the strong reasoning and the corrected mistakes.

Moving Forward with Case Studies
Implementing case studies might feel daunting at first, especially if you’re accustomed to more traditional teaching methods. Start small and try one mini-case this week. Pay attention to how students respond. Notice what questions emerge and what misunderstandings surface. Use that information to refine your next case. Every time students work through a case study, they’re building the clinical reasoning muscles they’ll use throughout their careers. They’re learning that there isn’t always one perfect answer, that client care requires weighing multiple factors, and that being a skilled practitioner means thinking critically, not just memorizing protocols.
Related Posts

Keep Q&A on track in massage classrooms by balancing participation and effectively handling disruptive questions....

Active learning begins where lectures end. Lectures introduce students to new concepts. Active learning requires...

Scenario-based learning is a powerful way to bridge the gap between theory and practice. In...